The ability to play scales and arpeggios on the piano is one of the most fundamental and most important skills of a pianist. Unfortunately, many homegrown piano teachers skip this, perhaps because they have no patience to sit down with the student and go through them. Worse, they do not know them as they were not taught by their former teachers either. Of course, they can get away with it if they don't send their students to the conservatory or take qualifying exams such as the ABRSM.
Even then, the problem becomes apparent when the student advances in their lessons. Some of the symptoms include: not being able to recognize the key of the piece, not being able to "hear" the tonality, cadences, modulations, and other harmonic elements, clumsy fingering or asking for the fingering, poor technique, grappling at the keyboard, poor sightreading (often intimidated by numerous accidentals), etc.
Scales and arpeggios codify the most important techniques in piano playing and acquaint the ear to tonality. However, it does not make them easy to learn. It took me one year of dedicated study to
learn all of the major and (harmonic) minor scales and arpeggios. Even
so, I am still honing, refining, and polishing them. Thus, patience and perseverance are just as important, or perhaps more important, than mere musical precocity or talent.
The professionals do it
Don't take my word for it. Take it from these two pianist-gentlemen, incidentally both having "Josefs" as first names (both also had connections with Anton Rubinstein):
I consider the practising of scales important, not only for the fingers, but also for the discipline of the ear with regard to the feeling of tonality (key), understanding of intervals, and the comprehension of the total compass of the piano. -
Josef Hofmann from Piano Playing: With Piano Questions Answered
They [students]
have had no teacher in the early years with patience and sufficient will power to hold them back until they have been exhaustively drilled in scales and arpeggios. A smattering will not do. They must know all the scales in all the keys, major and minor, and they must literally 'know them backwards.' They must know the inter-relationship of the scales... The scales should be known so well that the student's fingers will fly to the right fingering of any part of any scales instinctively... Scales are musical multiplication tables. -
Josef Lhevinne from Basic Principles of Pianoforte Playing
To proceed, you need the following:
1. Sheet of the scales and arpeggios. You may use Hanon exercise #39 but I remember feeling overwhelmed just looking at the 16th notes back then. I used Michael Aaron's Adult Piano Course Book II in reading the notes. It is basically the same as Hanon's except that the latter only spans two octaves while the other spans four and includes the melodic minor scale. I suggest the Aaron one for the beginner in scales (no melodic minor scale, only harmonic which is the most common).
2. Music notebook. Any would do.
3. Metronome. I prefer the digital kind. I have three analog metronomes in possession and they eventually break down, not to mention needing rewinding after a few minutes--an annoyance especially when you practice continuously for half an hour or more. Alternatively, you may download a metronome program or app into your laptop, cellphone, or iPad and you have an instant metronome.
Preparatory Exercises
As I've mentioned, scales and arpeggios are actually challenging to learn. It is best taken up after finishing the third grade when the student is more comfortable with reading notes. Hofmann added, "
Scales should not be attempted until a good finger-touch has been formed
and the very important action of the thumb in the scale has been fully
prepared."
In this regard, I suggest the first seven exercises of my
Top 10 Hanon Exercises, especially the following:
#40 - Chromatic Scale
The chromatic scale is usually taught after the major and minor scales have been mastered. However, I believe that it is actually easier to learn and serve as a good preparation for scales because of the simpler thumb, wrist, and hand movements. In particular, it is useful for moving the thumb smoothly since the thumb always plays the white keys and moves under the third finger which plays from above on the black keys.
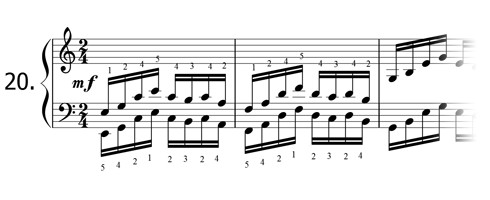
#20 - Little Arpeggios
This is a very effective exercise for stretching the fifth and fourth fingers and making them strong and independent. Many of the arpeggios are fingered for 5-4-1 (LH) and 1-4-5. The fourth finger being the weakest will drag the others. With this exercise, the fourth will gradually gain independence.
I did not include #38 because it is basically the C major scale. To be more useful, I will be modifying it to implement some of Lhevinne's ideas which will be a subject of future blog.
Sequence of Study
1. Start with the F major scale
Most teachers would start with the C scale because it has no accidentals (sharps and flats), therefore easier to read. However, I find the F major scale actually the trickiest because the B-flat note throws off the student from the standard fingering. It makes sense, at least to me, to start with this deceptively easy-looking scale.
a) Play the ascending and descending notes of the left hand (always start with the weaker hand) at 48 bpm per note, detached (portamento). Make sure your wrist allows the flowing movement of the thumb and the rest of the fingers. Play the right hand notes at the same speed, also detached. Play them together at 42 bpm per note (still detached). I suggest you do a crescendo ascending, starting with pianissimo (pp) and gradually increasing to forte (f) for the highest note and then falling back to a diminuendo when descending.
b) When there is no more awkwardness in the fingering and no more wrong notes, play the left hand notes but this time at 66 bpm per note, legato. Listen intently to the blending of the two consecutive notes. Do the same for the right hand, then play them together at 60 bpm per note, legato. I suggest the same dynamics treatment (crescendo for ascending, decrescendo for descending). Strive for a smooth sound.
c) If mastered, try increasing the speed from 72 to 88 bpm per note. Then, decrease the speed to 60 bpm but play two notes per beat (count 1 & 2 & 3 &) for two octaves. Stay at this speed for a few days or weeks then, try three notes per beat for three octaves (still at 60 bpm, count 1-2-3, 2-2-3, 3-2-3) and finally, four notes per beat for four octaves (count 1-2-3-4, 2-2-3-4, 3-2-3-4, 4-2-3-4). Stay at 60 bpm for now.
d) If you find yourself making random wrong notes at high speed, revert to (a) and (b) to remedy this. If you make more than one mistake, copy the scale in your music notebook. Why? First, this will teach you how to notate (make sure you get the accidentals correctly). Second, this will reinforce the scale in your visual and aural memory. Third, this will improve your sightreading. You will instantly recognize the key signatures.
2. Study its parallel harmonic minor scale, f minor
Again, many teachers may not agree with this as most scale sheets are written according to the circle of fifths. They would rather assign the relative minor, in this case d minor, since the key signatures appear to be the same.
However, based again on personal experience, I can "hear" the shift in mood much better from the modulation of the major keys to its parallel minor keys than its relative minor keys. They will both start and end in the same tonic so the starting finger would be the same.
Follow the same the regimen as above (a to d) but this time, play the crescendo-dimuendo a little softer (pianissimo to mezzo forte, vice-versa). This further highlights the contrasting moods.
3. Study the F major arpeggio
When you have achieved four notes to a beat at 60 bpm for the scales, it is now time to study the arpeggio. An arpeggio is actually an extended scale based on the triad pattern. In some ways, this is harder because the fingering is more awkward and the wrist must rotate in circles while the arm assists the movement.
NEVER practice the arpeggios with pedal (some teachers actually tell their students to do so!).
Follow the same working principles of (a) to (d), adjusting the speeds as necessary.
4. Study the f minor arpeggio
Following the logic of #2, it is better to follow the major arpeggio with its parallel. You will immediately hear and feel the difference of the modulation. The same practice principles (a) to (d) apply but follow the dynamic suggestion in #2.
5. Move on to the next key
When I studied the scales, I did not follow the circle of fifths. Instead, I proceeded chromatically and still practice the keys this way. That is, I start with F (then its parallel f minor), G-flat (then its parallel f# minor), and so on and end with the E major (and its parallel minor e minor). Never mind the enharmonic prissiness.
However, I realize this may be difficult for the newbie in scales. I would recommend the following sequence: F major/f minor, G major/g minor, A major/a minor, B major/ b minor, C major/c minor, D major/d minor, E major/e minor.
After the white tonic keys are finished, continue with the black keys: G-flat major/f# minor, A-flat major/G# minor, B-flat major/B-flat minor, D-flat major/C# minor, E-flat major/E-flat minor.
Closing Remarks: Level 1
It is important not to rush the study of scales and arpeggios. Progress in the beginning will be slow and arduous but after the studying the first four keys (F, G, A, B and their parallel harmonic minor), the rest will flow like oil. I suggest targeting two keys per month (for example, F major scale, f minor scale, F major arpeggio, f minor arpeggio). In one year, you will have finished the 24 major and minor keys.
Resist the temptation to blaze through them ("smattering" as Lhevinne had said) but keep them in tempo (hence, use a metronome) and legato. Importantly, shape them through dynamics. This is one of the secrets of expressive playing.
Scales and arpeggios are like brushing one's teeth. A serious pianist should feel "guilty" or uneasy if he/she fails to go through them everyday. I suggest doing them first thing in the morning, immediately after waking up, before taking a shower or breakfast. Once you play everything at 60 bpm (four notes to a beat, four octaves), you will cycle through the keys in 10 to 12 minutes. It keeps the fingers, hands, and ears in good condition and the mind musically fresh. You will feel their magic when you practice your repertoire or read new music later in the day.
What's next? There are many more levels of refinements which will be the subject of my future articles. The suggestions outlined here is just the first baby steps. In fact, their mastery is a lifelong preoccupation of pianists and musicians.
I leave you with some more wise words from the two Josefs:
Lhevinne:
their great practical value is for training the hand in fingering so that the best fingering in any key becomes automatic. In this way they save an enormous amount of time in later years. They also greatly facilitate sight reading, because the hand seems to lean instinctively to the most logical fingering, to elect it without thinking. Take it for granted, you may have too little scale practice, but you can never have too much.
Hofmann:
Alas, why are those pesky scales so difficult, in fact, the most difficult thing to do on the piano?
Good luck and happy practicing!